GODLIKE GBOX 4k HDMI/DP Fuser
Fuser Setup
Resolution check


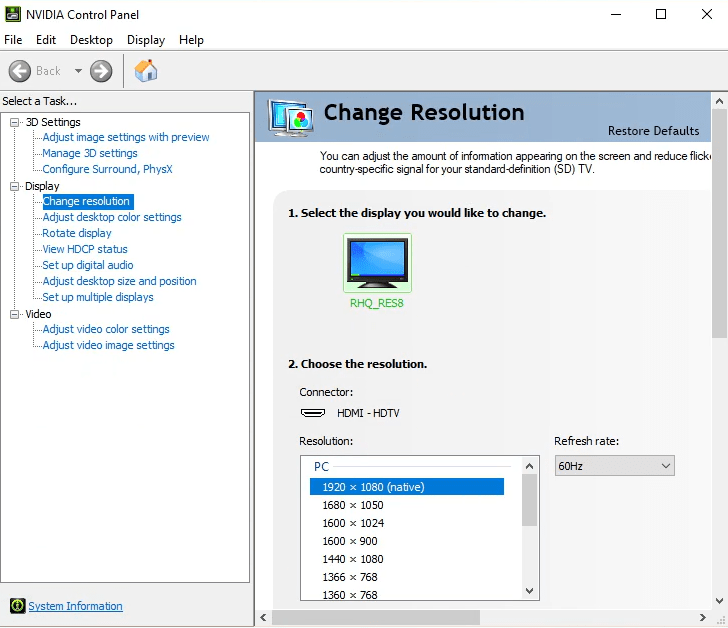
Before doing anything with the fuser. Ensure that the two systems you intend on using with the fuser are set to the same resolution and refresh rate.
Hardware Install

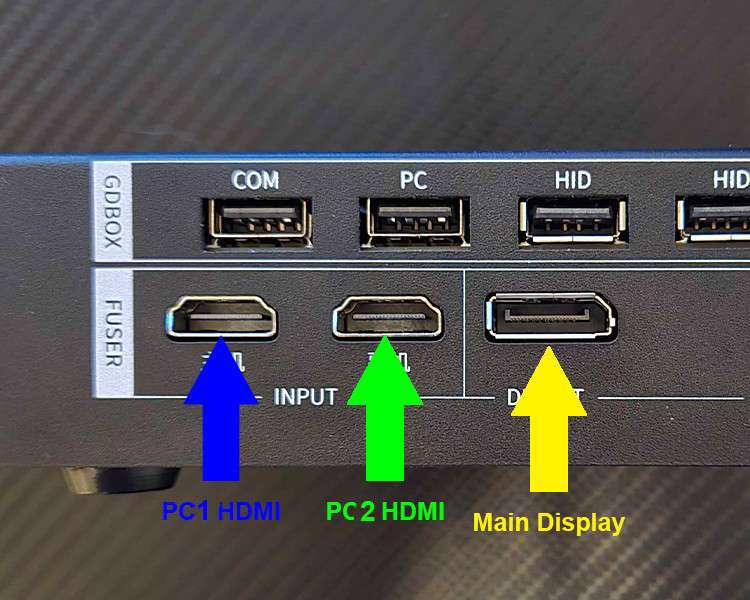
- Plug your main display that you intend on using throughout your experience to the yellow indicated display port.
- From your main PC plug a HDMI cable from either your GPU or motherboard into the blue labeled HDMI port.
- From your 2nd PC plug a HDMI cable from either your GPU or motherboard into the green labeled HDMI port.
- Power on the fuser using the power button in the front (not labeled in image)
Remote Usage

The included remote does not come with batteries. The remote requires a CR2025 battery. You can purchase this battery here or any local auto parts store that sells key fob batteries.

Yellow: Enable or disable display fusion
Green: Adjust the output quality for either display
Blue: Switch between displays when not actively fused
Red: Select your current resolution and refresh rate of both display inputs.
Pink: Change the color of the LED ring on top of the device.
Troubleshooting
All four lights on the front of the fuser are solid but monitor is solid black.
- Set both displays (within windows settings and GPU application settings) to 1920×1080 and 60hz.
- Power cycle both PC’s
- Unplug your main monitor and plug it back in
- Connect the fuser back normally with all 3 cables in there correct places.
- Ensure the fuser is turned on and press the EDID button on the remote
- Wait about 30 seconds and then press the 1K60 button on the remote.
- If the main display is still solid black, redo step #3.
- If your display is working correctly then increase the refresh rate and resolution incrementally until you are on your desired setting.
GBOX Setup
Wiring

Plug the computer that you intend to use as your second computer into the blue usb port.
Plug your main computer into the green usb port.
Plug either a mouse or keyboard into the yellow or red port(s).
Serial Driver Install

Open device manager on your SECOND PC and verify that you have the “USB Serial” device with the yellow triangle. This is the serial connection from the GBOX.

Download and run the CH341SER driver from here. Click “run” and then click “install”.

If you get the message “Driver install success!” then the driver was installed correctly. Otherwise please restart from here.
Conclusion

Active display fusion is indicated by all four lights on the front panel being active (not like pictured). GBOX functionality can be verified by testing if your mouse and/or keyboard work on the main pc when plugged into the gbox. This concludes the instructions for the GBOX Fuser. If you have any questions or issues please reach out to us here.


