KMbox Nvideo Quick Start Guide:
Table of contents

This guide will cover the physical wiring and windows settings that are required for using the KMbox Nvideo correctly.
Wiring
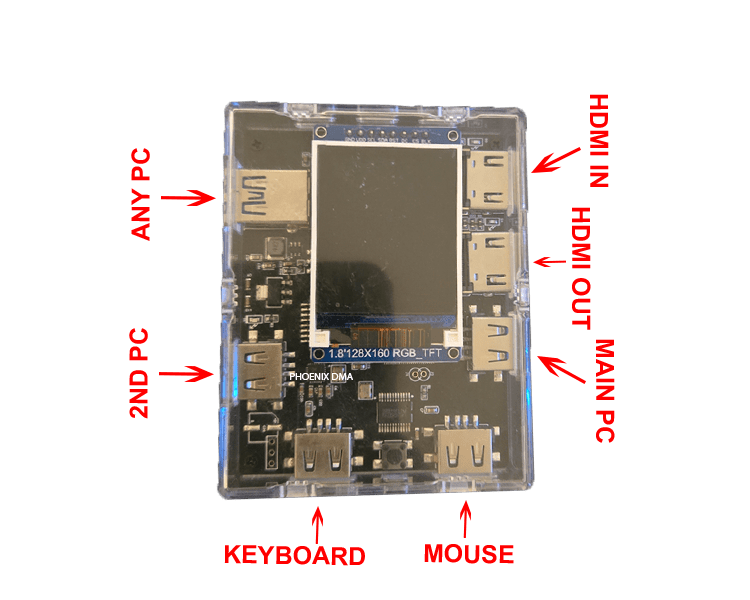
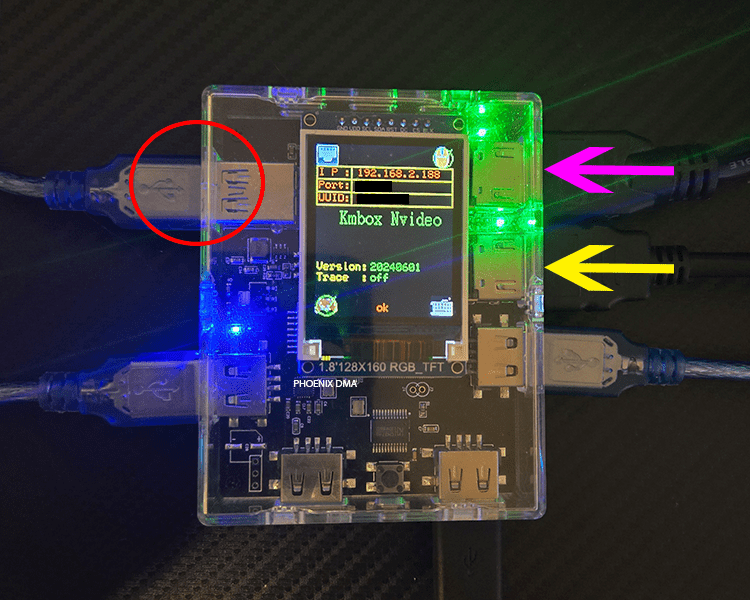
Notice: It is recommended to plug in the “ANY PC” cable last.
With the included usb cables (not pictured) connect them from your two computers to the KMbox Nvideo like shown in the image above. If you do not intend on using your Nvideo for graphic capture related reasons, you are not required to plug in the HDMI cables.
Windows IPv4 setting
Follow the video below that covers the needed IPv4 settings for Windows. These settings are changed on the 2nd PC.
Settings explanation:
- If your KMbox IP is 192.168.2.188 then your interface IP on your second PC must be between 192.168.2.1 and 192.168.2.254 but it cannot be the same as the KMbox IP (192.168.2.188). Only the last number (octet) changes.
- For the subnet mask, put 255.255.255.0.
KMbox Nvideo Graphics Capture
Note: The Nvideo supports up to 1920×1080@60Hz (factory specifications). If any higher resolution is set on the HDMI out, you will be capped at a 30Hz refresh rate. However, 120Hz has been seen when using the input only wiring setup.
Pass Through Wiring
Recommended for those who want to observe and/or control what is captured on the Nvideo on a monitor.

Single Input Wiring
Recommended for those who want a higher capture refresh rate and don’t mind having to control the captured device through OBS.
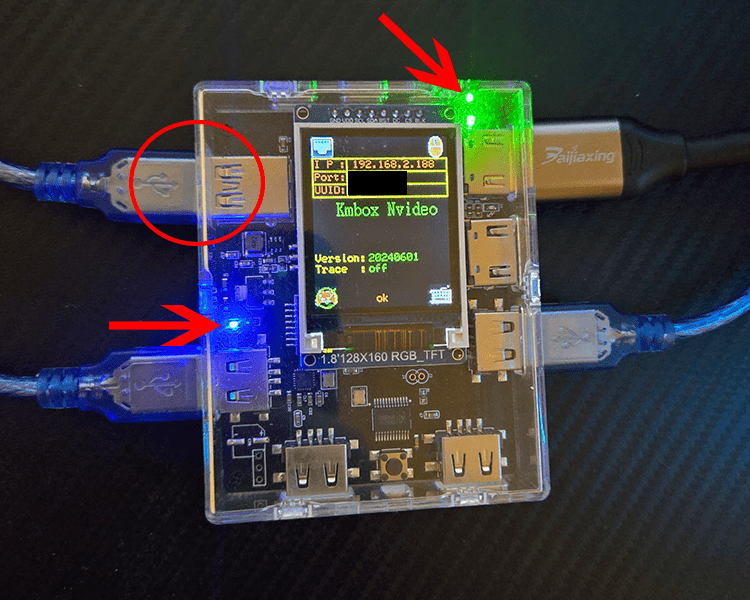
Before starting with this section or any section below, please ensure that:
- The circled USB cable (plugged into video out) is going to PC that you intend on capturing with.
- All LED’s marked by the red arrows are on.
Troubleshooting:
- (Pass through) If your KMbox Nvideo turns on while your plugging in either your HDMI in or HDMI out (while you have the circled port unplugged), ensure you are using two similar brand or type HDMI cables.
- (Pass through) If the monitor your connecting to the HDMI out port from the KMbox Nvideo is not turning on (with the circled port plugged in), ensure you are using two similar brand or type HDMI cables.
For any instructions in this guide, we are only going to be using OBS. If you do not have OBS, you can download it here.
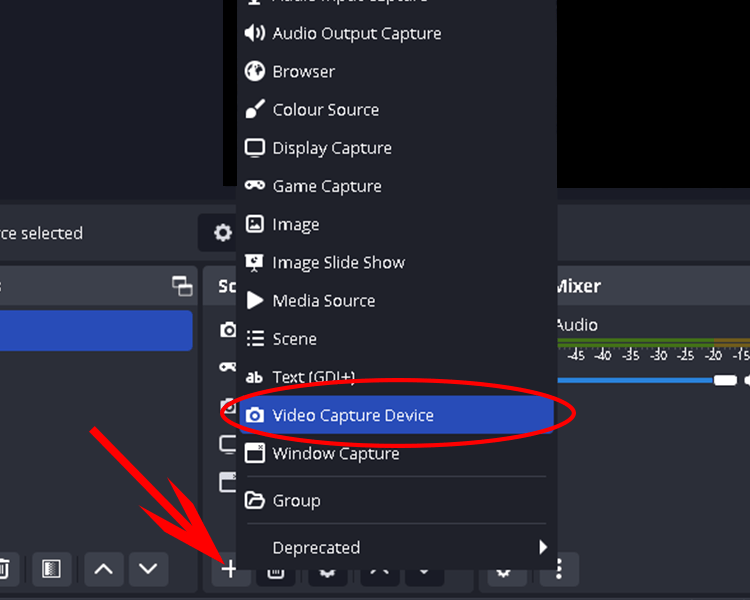
Open OBS and click the + symbol to add a new source to your scene then select the “Video Capture Device” source.
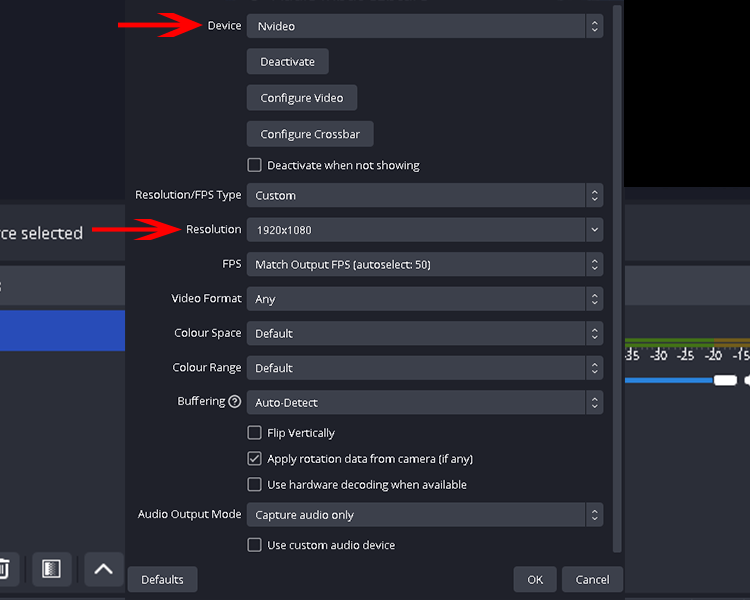
For this example, ensure that your settings are similar to what’s shown above. Specifically, ensure that the device is set to “Nvideo” and the resolution is set to “1920×1080”. When you finished, click “OK” to add the device. If done correctly, your HDMI input will be shown on your OBS scene.
KMbox Nvideo Fuser Capabilities
Prerequisites:
- Ensure you have done the Graphics Capture section.
- Download and install OnTopReplica
- For this example, we are overlaying onto a game, so within the games settings ensure the display mode is set to Borderless.
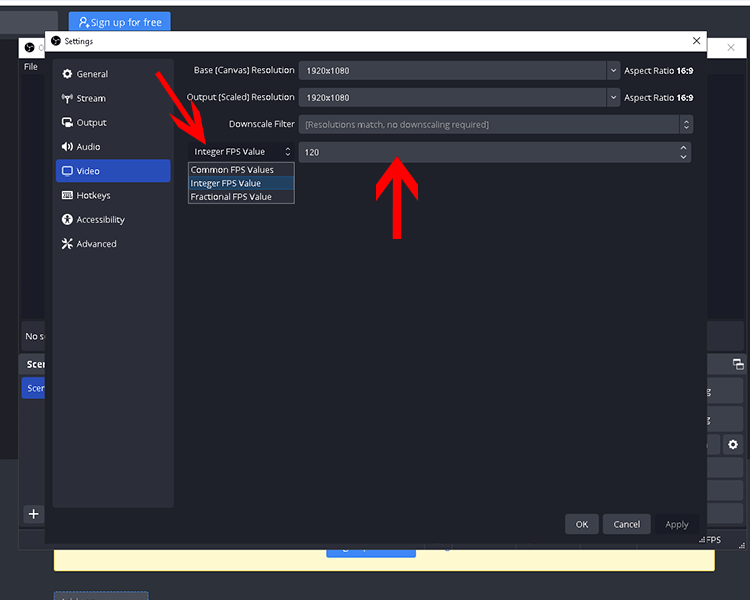
Within OBS go to settings>video. Click the “Common FPS Values” drop down and change it to “Integer FPS Value”. Change the value in the box to the highest possible FPS then click Apply and OK.
Table of contents
Overlay Methods
- Black background overlay (supported by any project that supports normal fusers)
- Transparent background overlay (not supported by all projects, provides a better overlay quality)
Black background overlay
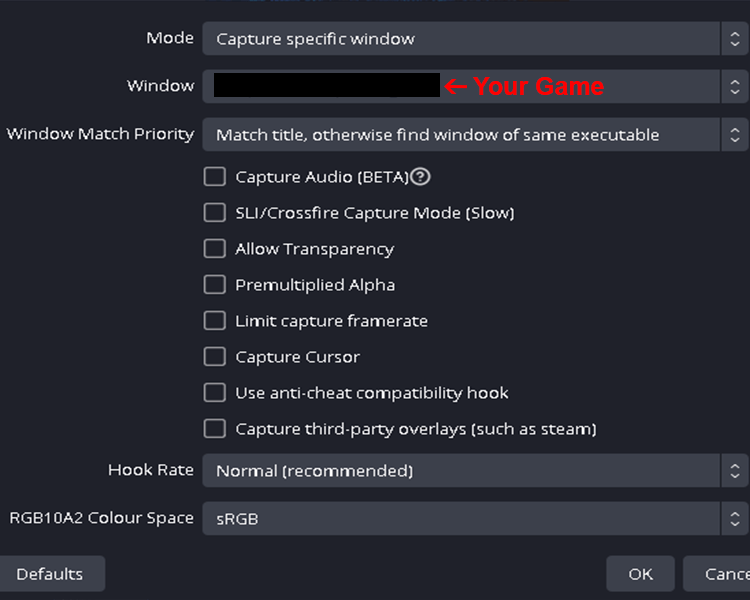
Have whatever game you desire opened up and click the + in OBS in the sources tab. Select “Game Capture”. Ensure the settings are similar to what is shown above. If you are missing some options, please update your OBS. Click “OK” when done.

After adding your game, ensure that the “Video Capture Device” source for your Nvideo is placed above your Game Capture. At this point, ensure whatever overlay you want to use on the 2nd PC is up and running.
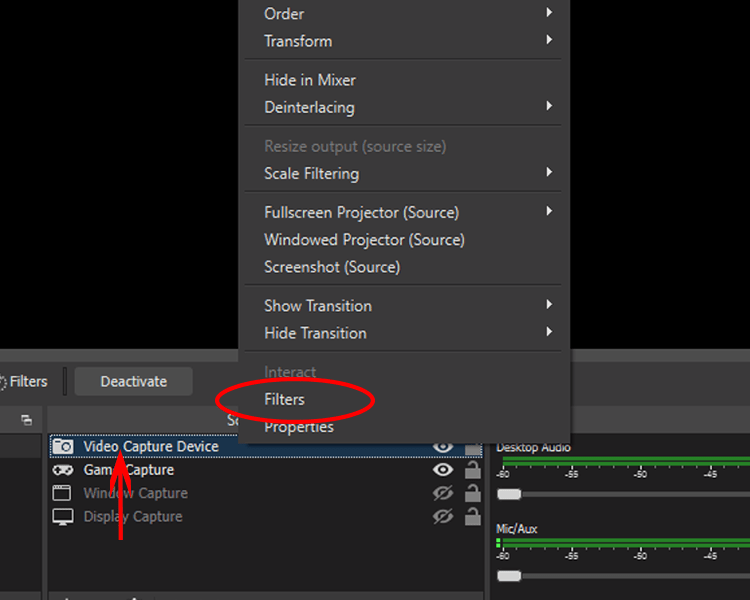
Right click the “Video Capture Device” and click the filters option in the menu.
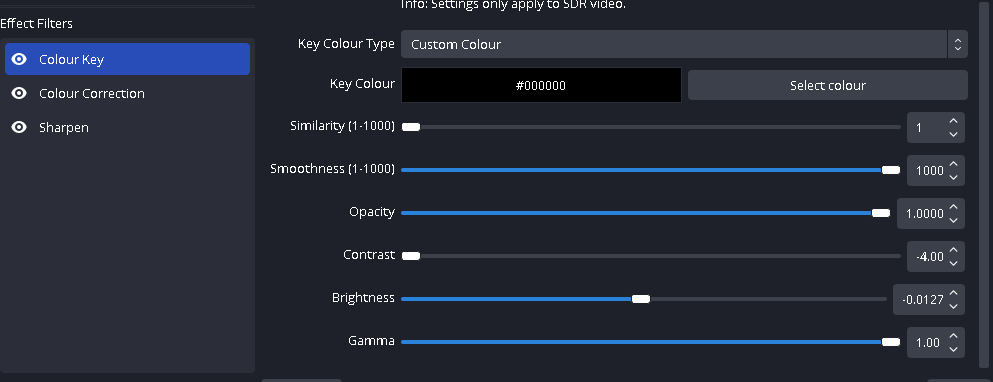
In the “Effect Filters” section at the bottom left, click + icon and add in the “Color Key” filter. Adjust the filter settings as close as possible to the image above.
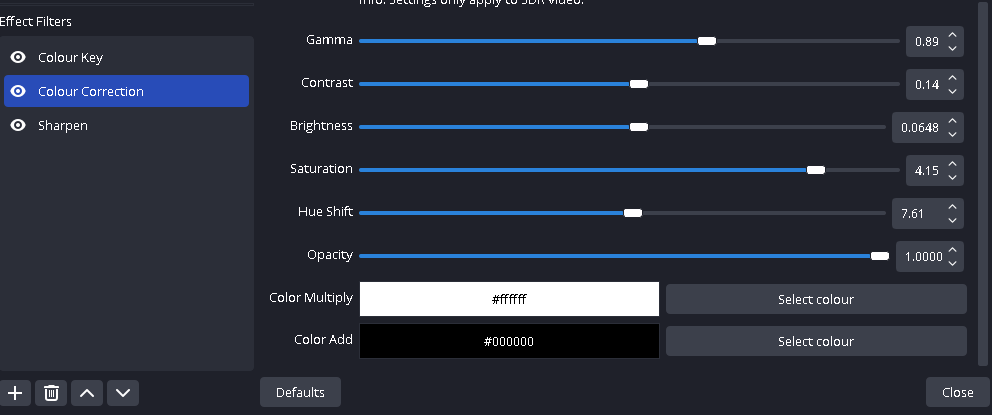
Do the same with the “Color Correction” filter.
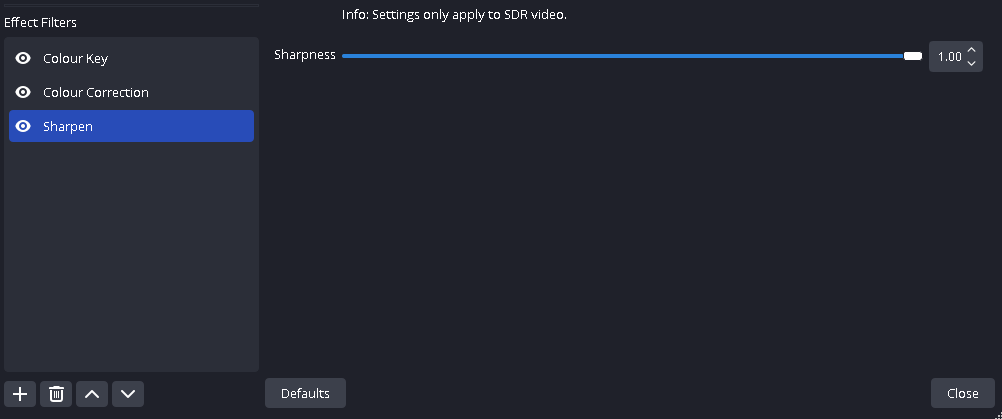
Do the same with the “Sharpen” filter.
At this point, your overlay should be somewhat transparent over your game within OBS. if this is not the case, please contact us and we will assist you.
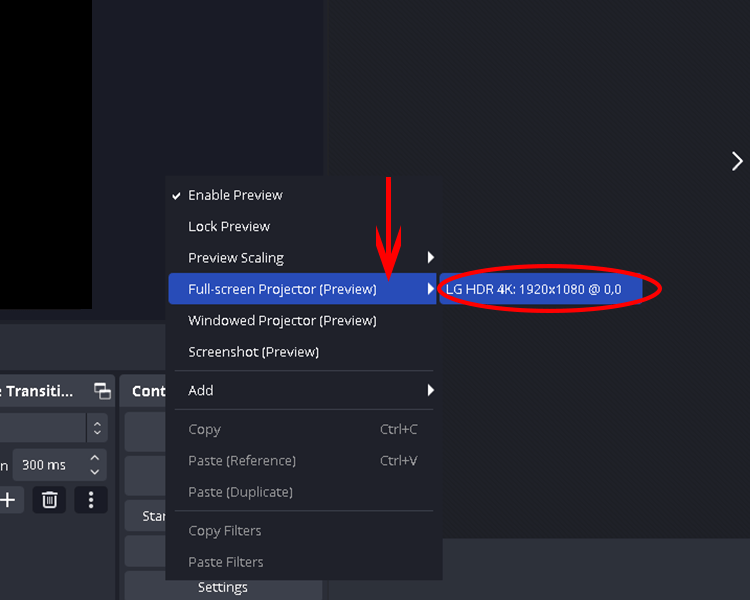
Right click beside your OBS scene and select “Full-screen Projector (Preview)” and then select your main monitor.
Important – After doing this, alt tab or use the windows key to select your game. This is to ensure the game is “on top” of the OBS projection.
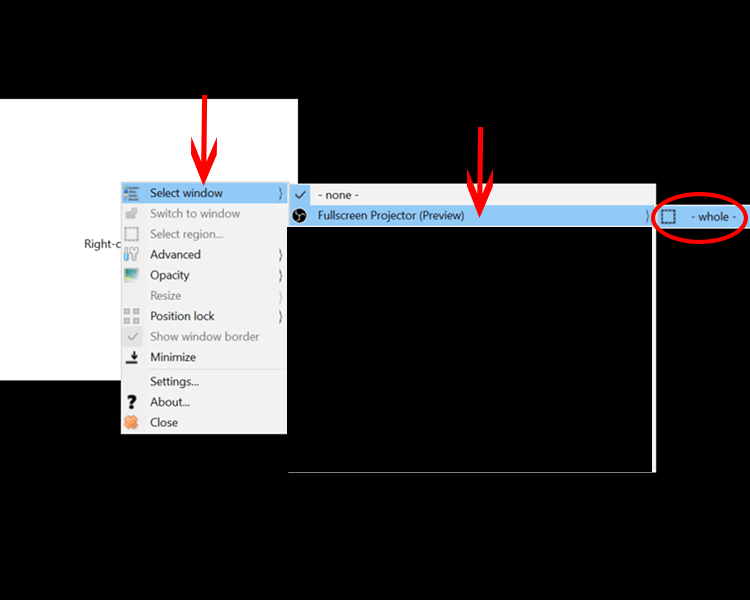
Open the OnTopReplica application. Right click into the white square and navigate to Select Window>Full screen Projector (Preview)>whole.
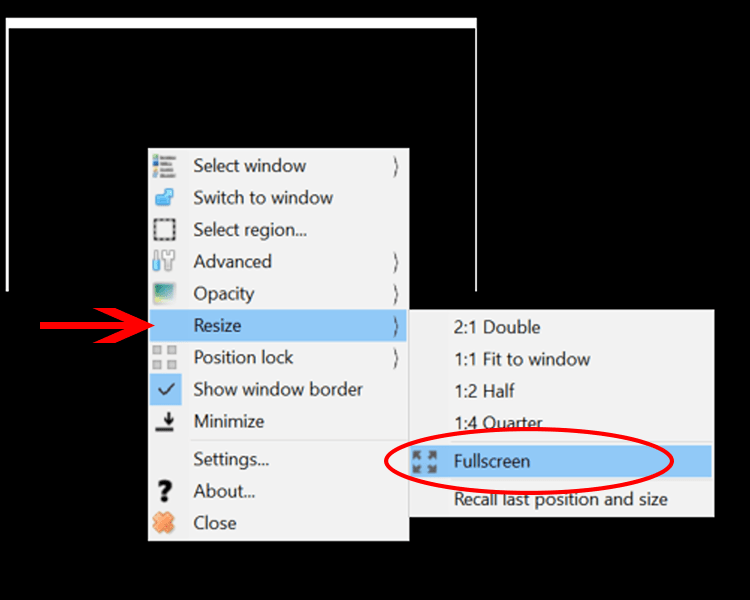
Right click into the replicated window and navigate to Resize>Full screen
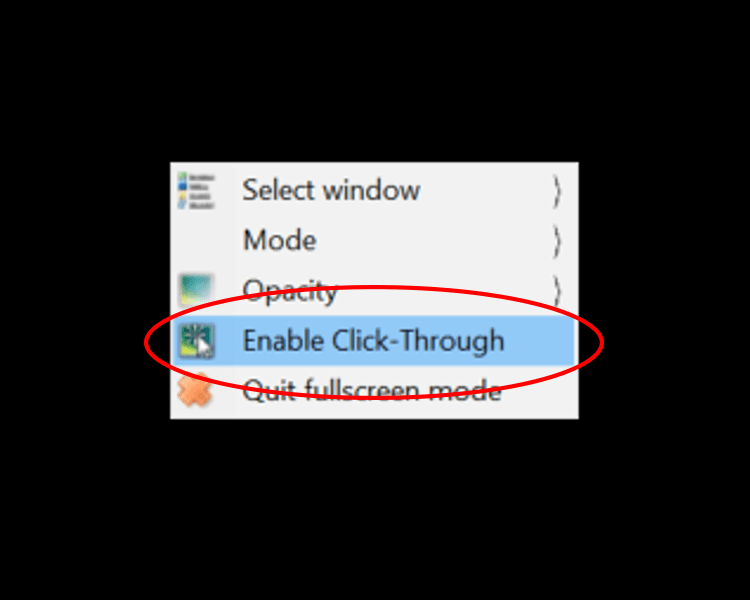
Right click into the full screen window and select “Enable Click-Through”
At this point, you should be able to play your game normally through the OnTopReplica application with both your game and overlay showing. If that is not the case, please contact us and we will assist you.
Better performance has been noticed when enabling “V-sync” in the overlay.
Transparent background overlay
This method has a setup very similar to the black overlay method but with a few filter changes and settings that must be changed on the 2nd PC.
Prerequisites:
- Download this image or any solid black image of your choosing.
- (optional) Download and install TranslucentTB from the windows app store.
On your 2nd PC, set your desktop background to the solid black image downloaded above.
On your 2nd PC, right-click your desktop, navigate to view>Show desktop icons. Ensure this is unchecked.
On your 2nd PC, right-click your taskbar. Open Taskbar settings and enable “Automatically hide the taskbar in desktop mode”.
(optional) On your 2nd PC, run the TranslucentTB and ensure the app sets your taskbar to be transparent. If not, you can set the settings through the app on the taskbar (the up arrow menu beside your volume icon). This is to remove the little line on the bottom of your screen where your taskbar disappears.
The rest of the guide will be done on your Main PC unless otherwise specified.

Note: If your already familiar with the initial OBS settings, you can skip to the filters.
Have what ever game you desire opened up and click the + in OBS in the sources tab. Select “Game Capture”. Ensure the settings are similar to what is shown above, if you are missing some options, please update your OBS. Click “OK” when done.

After adding your game, ensure that the “Video Capture Device” source for your Nvideo is placed above your Game Capture. At this point, ensure whatever overlay you want to use on the 2nd PC is up and running and that the overlay mode is set to transparent.

Right-click the “Video Capture Device” and click the filters option in the menu.
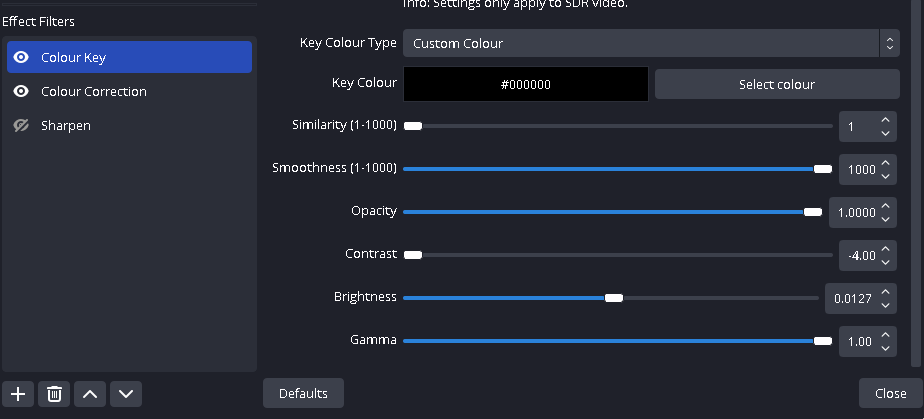
In the “Effect Filters” section at the bottom left, click + icon and add in the “Color Key” filter. Adjust the filter settings as close as possible to the image above. Use these settings as a baseline and adjust from here to find your preferred overlay quality.
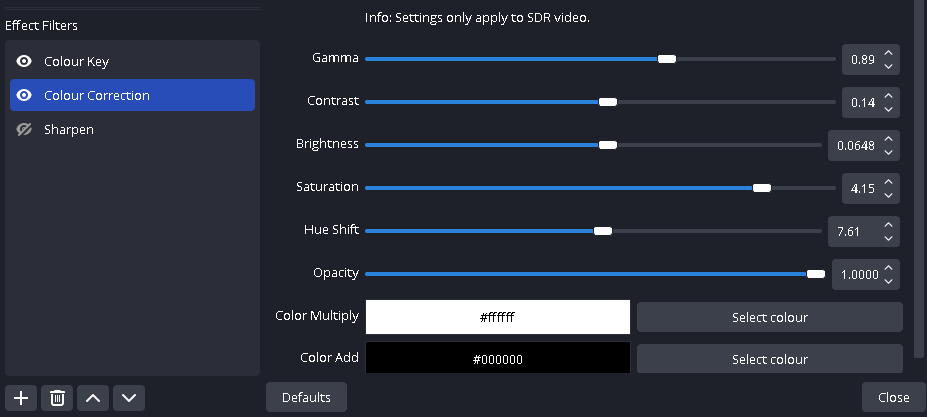
Do the same with the “Color Correction” filter.
At this point, your overlay should be somewhat transparent over your game within OBS. if this is not the case, please contact us and we will assist you.

Right click beside your OBS scene and select “Full-screen Projector (Preview)” and then select your main monitor.
Important – After doing this, alt tab or use the windows key to select your game. This is to ensure the game is “on top” of the OBS projection.

Open the OnTopReplica application. Right click into the white square and navigate to Select Window>Full screen Projector (Preview)>whole.

Right click into the replicated window and navigate to Resize>Full screen.

Right click into the full screen window and select “Enable Click-Through”
At this point, you should be able to play your game normally through the OnTopReplica application with both your game and overlay showing. If that is not the case, please contact us and we will assist you.
Better performance has been noticed when enabling “V-sync” in the overlay.
KMbox Nvideo Recording Fused Overlays
Like any other capture card, the Nvideo can be used to record what is on your main screen and what is on your second PC (or whatever device you have plugged into the HDMI in) at the same time. Going off of what is instructed above, we are going to cover how you can record game play with overlays in the same OBS scene. There are two methods explained here:
- Recording while using the Nvideo as a fuser.
- Recording using an external fuser.
Recording using the Nvideo as a fuser
Since the majority of what you have to do is explained above, we will not be using any image explanations for this.
- Start setting up your Nvideo using either the black background or transparent background (recommended) overlay.
- After you complete the step of setting your OBS scene to “Full-screen Projector (Preview)”, start recording your scene then.
- Continue on with the rest of the steps normally for either overlay method.
If an image guide is needed please contact us.
Recording using an external fuser
Before starting with this section or any section below, please ensure that:
- The circled USB cable (plugged into video out) is going to the PC that you intend on capturing with.
- The cable in the PINK port is coming from your 2nd PC.
- The cable in the YELLOW port is going to your fuser.
Ensure that your fuser is set to 1K60 (1920×1080 60Hz)
Do everything in the Graphics Capture section using the pass through wiring with the edits in the image above.
For this example and for the sake of quality, we are going to be using the transparent overlay setup. You can use either the transparent or the black overlay when recording.
Prerequisites:
- Download this image or any solid black image of your choosing.
- (optional) Download and install TranslucentTB from the windows app store.
On your 2nd PC, set your desktop background to the solid black image downloaded above.
On your 2nd PC, right-click your desktop, navigate to view>Show desktop icons. Ensure this is unchecked.
On your 2nd PC, right-click your taskbar. Open Taskbar settings and enable “Automatically hide the taskbar in desktop mode”.
(optional) On your 2nd PC, run the TranslucentTB and ensure the app sets your taskbar to transparent. If not, you can set the settings through the app on the taskbar (the up arrow menu beside your volume icon). This is to remove the little line on the bottom of your screen where your taskbar disappears.
The rest of the guide will be done on your main PC unless otherwise specified.

Note: If your already familiar with the initial OBS settings, you can skip to the filters.
Have what ever game you desire opened up and click the + in OBS in the sources tab. Select “Game Capture”. Ensure the settings are similar to what is shown above, if you are missing some options, please update your OBS. Click “OK” when done.

After adding your game, ensure that the “Video Capture Device” source for your Nvideo is placed above your Game Capture. At this point, ensure whatever overlay you want to use on the 2nd PC is up and running and that the overlay mode is set to transparent.

Right-click the “Video Capture Device” and click the filters option in the menu.

In the “Effect Filters” section at the bottom left, click + icon and add in the “Color Key” filter. Adjust the filter settings as close as possible to the image above. Use these settings as a baseline and adjust from here to find your preferred overlay quality.

Do the same with the “Color Correction” filter.
At this point, your overlay should be somewhat transparent over your game within OBS. If this is not the case, please contact us and we will assist you. Now you can play your game normally and use your external fuser how it’s intended. When you wish to record your gameplay, simply start recording in OBS.
KMbox Nvideo Controller Usage
The official application for using the KMbox Nvideo with an XBOX controller is still under development as of 8/5/2024. However, you are able to use alternate software on your main pc that will work with the Nvideo.
- KMbox Official Controller Usage (in development)
- Anti Micro Controller Usage
Anti Micro Controller Usage
Confirmed working on XBOX series controllers

While using antimicro with the KMbox Nvideo, you are replacing the default controller input with mouse and keyboard input. You do not have to plug your controller into the kmbox directly, you can plug it into the computer how you normally would. This has been tested and validated on a wired XBOX 1 controller. For the premade profiles linked above, they are built from very old games, so while the profiles may not be good to go right away, they will still save you a substantial amount of time versus building a profile from scratch.


